Saat-saat tertentu mungkin anda memerlukan booting dari flashdisk dikarenakan Windows anda ngadat atau pingsan diserang Virus yang semakin menjadi-jadi. Inilah cara paling cepat membuat satu flashdisk agar bisa booting langsung dari file iso (image cd/dvd) :
1. Siapkan pc, notebook, netbook atau tablet yang BIOS nya mendukung boot dari usb flashdisk. Sediakan flashdisk yang mendukung bootable. Kebanyakan netbook pasti mendukung boot dari usb flashdisk, sebagaimana kebanyakan flashdisk juga mendukung untuk di-bootable-kan. (alif memakai VanBook dan flashdisk Kingstone 8 GB & Adata 4 GB).
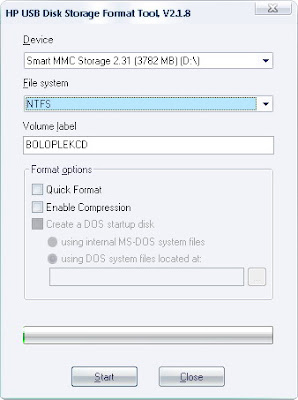
2. Format flashdisk dengan system file NTFS memakai HP USB Format tool (Download di sini, pakai HPUSBFW.exe). Hati-hati dan cermat saja saat memilih drive flashdiksnya, jangan salah pilih.

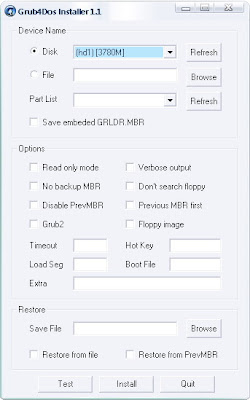
3. Install bootloader Grub4dos dengan menjalankan grubinst_gui.exe (di folder tool downloadan sudah tersedia, grubutil-1.1-bin-w32-19), pilih flashdisk dengan tepat. Abaikan saja menu pilihan hal-hal yang anda belum tahu pasti.

4. Copy grldr, ntldr, ntdetect.com, boot.ini dan menu.lst dari folder tool downloadan tadi, ke root flashdisk dan timpa saja bila ada yang sama.
5. Edit menu.lst dengan notepad sesuai selera kebutuhan anda. Contoh menu.lst alif :
color blue/cyan yellow/cyan
timeout 6
default /default
title Boot from Hardisk (Start Windows)
root (hd0,0)
chainloader (hd0,0)/ntldr
title Start Active@Boot CD
find --set-root --ignore-floppies /iso/activ.iso
map /iso/activ.iso (hd32)
map --hook
chainloader (hd32)
boot
title Start Mini WindowsXP Live
find --set-root --ignore-floppies /iso/xp.iso
map /iso/xp.iso (hd32)
map --hook
chainloader (hd32)
boot
title Start TrueBoot
find --set-root --ignore-floppies /iso/true.iso
map /iso/true.iso (hd32)
map --hook
chainloader (hd32)
boot
title Start PuppyBoot
root (hd0,0)
chainloader /isolinux.bin
title Start HirenBootCD 9.9
find --set-root --ignore-floppies /iso/hiren.iso
map /iso/hiren.iso (hd32)
map --hook
chainloader (hd32)
boot
title Start AviraBoot
find --set-root --ignore-floppies /iso/avira.iso
map /iso/avira.iso (hd32)
map --hook
chainloader (hd32)
boot
title Start UBCDBoot
find --set-root --ignore-floppies /iso/ubcd.iso
map /iso/ubcd.iso (hd32)
map --hook
chainloader (hd32)
boot
title Start DataRescue
find --set-root --ignore-floppies /iso/data.iso
map /iso/data.iso (hd32)
map --hook
chainloader (hd32)
boot
title Start TinyCore
find --set-root --ignore-floppies /iso/core.iso
map /iso/core.iso (hd32)
map --hook
chainloader (hd32)
boot
title Start Kolibri
find --set-root --ignore-floppies /iso/koli.iso
map /iso/koli.iso (hd32)
map --hook
chainloader (hd32)
boot
title Start MeneutBoot
find --set-root --ignore-floppies /iso/menuet.iso
map /iso/menuet.iso (hd32)
map --hook
chainloader (hd32)
boot
title Loading Reatogo
root (hd0,0)
chainloader /minint/setupldr.bin
6. Sesuaikan file iso image bootable anda dan copy/masukan ke dalam suatu folder di root dengan nama sesuai menu.lst (alif pakai nama “iso”)
7. Restart komputer
8. Setting agar bios bisa boot dari usb flashdisk, jika belum.
9. Saat boot dari flashdisk, pilih menu bootable yang anda inginkan. Alif sukses mencoba dan menjalankan Mini Windows XP Live, WinPE 2.0, Active@boot CD, Trueimageboot, Hiren’s boot CD 9.9, UBCD Ultimate BootCD, TinyCore Linux, Mini Windows 98 Live, Kolibri OS dan lainnya.
Keuntungan memakai cara ini :
- File-file boot relatif aman karena tersimpan dalam format iso image yang hampir tidak mungkin diserang Virus.
- Boot dari flashdisk relatif lebih cepat dibanding dari CD/DVD, dan flashdisk juga ditengarai lebih awet daripada keping CD atau DVD jika sering dipakai (cd lebih cepat kotor dan tergores).
- Anda tetap bisa menggunakan flashdisk sebagai media penyimpanan data. Bahkan…
- Dengan format NTFS, flashdisk anda sekarang bisa mengcopy satu file yang ukurannya lebih besar dari 4 GB, hal yang tidak bisa jika system filenya FAT16 atau FAT32.
- Untuk merubah, membuat atau menambah boot system baru, anda tidak perlu mengulang dari awal, cukup copy file iso-nya ke folder iso dan edit menu.lst. (Selama tidak terserang virus boot sector yang merusak tentunya)
Other Way
How to create a Multiboot USB Flash Drive that you can use to Boot Multiple ISO Files from USB. Please note that you will need a large USB device to be able to support every bootable ISO listed in the Grub menu. I will update and add more Bootable ISO files to the list as I find the time to test them. You can also contact us to submit working Bootable ISO entries for inclusion.
MultiBoot USB Menu (Simply select an ISO to boot from USB)
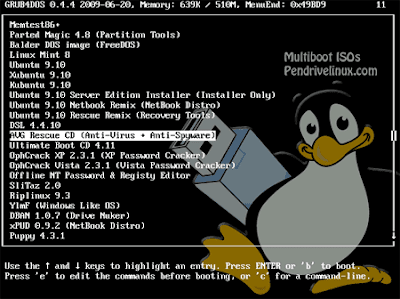
MultiBootISOs Works by using Syslinux to chainload GRUB4DOS. At Startup, the following Boot menu is presented.
MultiBoot Grub Menu - ISO files that can be Booted from USB
Note: You must manually add the ISO Files to your Flash Drive.
Basic Essentials to create a Multi ISO Boot USB Flash Drive
* "Fat32 Formatted" 512MB-8GB USB Flash Drive (depending on how many ISO's you use)
* PC that can boot from USB
* Windows XP/Vista/7 host to create the Bootable USB
* MultiBootISOs.exe
* Your select ISO Files
This MultiBoot process will currently enable you to Boot the following:
Official Distribution Sites and corresponding download links are listed.
* Memtest86+
* Clonezilla
* Linux Mint 8
* Ubuntu 9.10
* Xubuntu 9.10
* Kubuntu 9.10
* Ubuntu 9.10 Netbook
* Ubuntu Server Edition
* Parted Magic 4.9
* Partition Wizard 4.2
* Damn Small Linux
* Ultimate Boot CD
* SliTaz Linux Site
* Ophcrack XP Site
* Ophcrack Vista Site
* Offline NT Password + Reg Editor Site
* RIP Linux 9.3 Site
* Ylmf OS Site
* DBAN 1.0.7 (Hard Drive Nuker)
* xPUD (Simple Netbook Distro)
* FreeDOS Site (put balder10.img on USB)
* BKO boot.kernel.org (put gpxe.lkrn on USB)
* AVG Rescue CD
* Puppy Linux 4.3.1 (Download initrd.gz, vmlinuz, and pup-431.sfs and put them in the puppy folder on your USB)
How to Boot Multiple ISO Files from USB
1. Download and run MultiBootISOs.exe following the onscreen instructions
2. Download some ISO Files (listed above) and place them on your Flash Drive
3. Restart your PC setting it to boot from the USB device
4. Select the ISO you want to Boot from the Menu and enjoy!
That's all there is to it. You should now be booting your favorite ISO files from your Multi-Boot USB device!
Additional Notes: You can boot Ubuntu and remixes with persistence by using our Casper-RW Creator script to create a Casper-RW file on your USB device. One Distro can use casper persistence only!
If you don't have a floppy drive and get fd0 errors while booting, simply add floppy.allowed_drive_mask=0 to the kernel line for that menu entry.
To load Ophcrack tables when booted in this fashion, the tables folder needs to exist at the root of the USB device. Example E:\tables\vista_free. Download Tables from the Official site and unzip to your USB.
Boot Errors: While trying to run an ISO from USB, If you get a Boot error saying:
Error 60: File for drive emulation must be in one contiguous disk area
You'll need to defragment your ISO using one of the following tools:
contig - Command line tool to defragment ISO files.
wincontig – GUI tool to defragment ISO files.
For information on how to try other ISO's, see the "CDROM emulation (virtualization) section" in the official GRUB4DOS Readme file. Additionally, Here is another good third party guide that explains how things work.
If you successfully boot from a Linux Based ISO that isn't listed, let me know and I will add it to the list.
Tidak ada komentar:
Posting Komentar