Senin, 19 April 2010

Perpustakaan Gratis Senayan Library


Download Senayan 3.12 Portable

Senayan Library adalah software perpustakaan yang bagus untuk diterapkan baik di sekolah maupun persewaan buku. Software gratis ini memiliki fasilitas katalog buku, manajemen simpan pinjam, daftar anggota, sirkulasi, reports dan barcode support. Kebutuhan minimal yaitu komp PIII, Ram 128 dengan OS Linux / windows, Local Server dan Web Browser. Mendukung beberapa pilihan tampilan dan bahasa, termasuk arab dan indonesia.

Dengan mencoba versi Portablenya, anda tinggal mengekstraknya ke C:\ atau D:\, jadikan folder senayan di root. Lalu jalankan start apache.bat kemuadian start mysql.bat, baru buka browser kesukaan anda dan tulis alamat http://localhost, anda sudah bisa melihat daftaf menu yang ada bahkan bisa mengatur dan membuat daftar buku dan lainnya. Sangat cocok untuk sekolah-sekolah bahkan universitas dan perpusda.

Ingat untuk Librarian Login, user = admin, Password = admin
.

Features

Online Public Access Catalog (OPAC) with thumbnail document image support (can be use for book cover), Simple Search and Advanced Search mode
Documents record detail in XML format
Bibliographic/catalog database management with book cover image support
Document items database management
Master Files management to manages document referential data such as GMD, Collection Types, Publishers, Authors, Locations, Authors and Suppliers
Circulation support with following features:
Loan and Return transaction
Collections reservation
Quick return
Configurable and flexible Loan Rules
Membership management
Stock Taking module to help Stock Op name process in library
Reporting and Statistics
System modules with following features:
Global system configuration
Modules management
Application Users and Groups management
Holiday settings
Barcodes generator utility
Database backup utility
Software requirements

PHP 5 scripting engine (version > 5.1, Senayan is developed under PHP 5.2.4)
GD support is enabled. GD support must be build with PNG, JPG, GIF and FreeType support (on *NIX system you can achieve it by building PHP with –-with-gd –-with-png-dir=/usr/lib –-with-jpeg-dir=/usr/lib -–with-freetype-dir=/usr/lib and be sure that PNG, JPEG and Freetype library and development header already installed, check your OS/distro documentation on how to install them)
XML supports (usually this is enabled by default in PHP 5)
mysqli support
A Web server (Apache 2.2 is recommended)
MySQL Database server (version > 4.1, but we recommend >= 5.0)
mysqldump utility for database backup
GNU/Linux, FreeBSD, Solaris or Windows operating system
Javascript 1.5, AJAX and CSS 2 capable and enabled browser such as Mozilla Firefox 2, Opera 9, Konqueror 3.5 (include Safari), or Microsoft Internet Explorer >= 6.0
PDF document reader such as Adobe Reader, Evince or Foxit PDF Reader to view PDF document created by Senayan
Hardware Requirements

Pentium III class processor
256 MB of RAM
Standard VGA with 16-Bit color support
Optional : Barcodes reader to scan barcodes in circulation modules
[Diknas]

Free AMR audio player software - AMR Player : Pemutar File Suara Standar Handphone


Adaptive Multi-Rate (AMR) is an audio data compression scheme optimized for speech coding. AMR was adopted as the standard speech codec by 3GPP in October 1998 and is now widely used in GSM and UMTS. It uses link adaptation to select from one of eight different bit rates based on link conditions.

AMR is an audio format which is extensively used in mobile devices in various applications ranging from normal audio player/recorder to VoIP kind of applications. AMR can be further categorized as: AMR-NB( NarrowBand ) and AMR-WB( WideBand ).

AMR-WB ensures that speech quality is optimized in a mobile station by verifying its ability to determine when to request a change to another codec with either more or less error correction and protection as signal quality changes. AMR-NB (Adaptive Multi-Rate Narrowband) is a vocoder employed in low-bitrate applications like mobile phones.

AMR is also a file format for storing spoken audio using the AMR codec. Many modern mobile telephone handsets will allow you to store short recordings in the AMR format, it should be remembered that AMR is a speech format and is unlikely to give ideal results for other audio. The common filename extension is .amr.

Free AMR audio player software - AMR Player

AMR Player is one freeware to let you can play the AMR audio files on your PC, and support to convert common multimedia file formats ( such as MP3 or WAV) to audio AMR/AWB format, or output AMR audio files to MP3/WAV audio format.

The usage of AMR Player is very simple, click "Add Files" button of the main interface, select the one ".amr" file, then click "Play" button, AMR Player can decode the AMR audio file, then play the audio/music for you. If you want to convert AMR to MP3 format, just select one AMR files that you had added, click "AMR to MP3", input one MP3 file name, the free program can convert your AMR files at once, both MP3 and WAV are popular audio formats.

Main Features about AMR Player

Simple interface and easy to use;
Support both AMR-NB and AMR-WB audio formats;
Convert MP3 to AMR;
Convert WAV to AMR;
Convert AMR to MP3;
Convert AMR to WAV;
"100% Free", this software is freeware for both personal and commercial use.

Download

The latest version of AMR Player is 1.3 (some small bugs fixed), it is one %100 free software, no adware or no spyware, and you can download here:

Download AMR Player
.

Senin, 05 April 2010

Active@ Boot Disk 5.05


Active@ Boot Disk is a complete and functioning computer operating system on CD/DVD/USB disk. You simply insert a boot disk into your computer, and reboot. While a live CD does not modify the operating system already installed on a computer's hard drive, it includes many tools to boot up a computer and fix most startup, PC configuration, and system management problems.

Active@ Boot Disk based on lightweight Windows VISTA (WinPE 2.1) operation environment and contains disk image, data recovery, password resetting, data erasure, network access tools and system utilities.

Active@ Boot Disk is a custom configured system.
Necessary drivers and scripts can be installed.
One may add an alternate language keyboard layout.

Active@ Boot Disk (Win Edition)
Active@ Boot Disk is a bootable CD that gives you a lightweight Windows VISTA (WinPE 2.1) environment with disk image, data recovery, password resetting, data erasure and network access tools.
The WinPE 2.1 Operating System runs entirely from Random Access Memory (RAM), enabling you to insert a second CD that contains drivers or software or can be used for CD/DVD burning.

Active@ Boot Disk comes with a collection of powerful utilities, giving you the confidence to repair failed systems:
Active@ Disk Image - Imaged-based data backup and restoration tool


Active@ File Recovery - Deleted data recovery software
Active@ Partition Recovery - Lost partition recovery software
Active@ Hex Editor - Tool for editing disk in a binary format
Active@ Password Changer - Windows password resetting tool


Active@ KillDisk - Secure data erasure and disk wiping software


PC Disk Partition Manager - Add, edit, delete, format and manage the partitions in your computer
Active@ CD/DVD Data Burner - CD/DVD burning software
Network operations utilities -
Map Network Drive
Remote Desktop Connection
Web browser
FTP Client
Telnet Client
Network Configuration Utility
System Utilities
Internet Utilities
Other Utilities
File Explorer
Task Manager
On-Fly Drivers Loader
Display Configuration Utility
Notepad
Command Prompt shell

Requirements for Using Active@ Boot Disk (Win Edition)

To use Active@ Boot Disk, you must have the following:
Pentium II processor or higher
300MB or more RAM
A CD/DVD drive or a USB mass storage device to boot from

In addition to the above, you must be able to turn on power to the machine and you must have access to the system board BIOS setup.

Active@ Boot Disk (DOS Edition)
Active@ Boot Disk Professional combines six powerful tools that let you recover your lost data, reset Windows passwords, make computer system backups and securely erase data. Active@ Boot Disk is used from a bootable CD-ROM to start the PC.

Active@ Boot Disk (DOS Edition) contains the following products:
• Active@ UNERASER
• Active@ Partition Recovery
• Active@ KillDisk
• Active@ Disk Image
• Active@ NTFS Reader
• Active@ Password Changer

Requirements for Using Active@ Boot Disk (DOS Edition)

To use Active@ Boot Disk (DOS Edition), you must have the following computer hardware:
386 processor or higher
A CD/DVD drive
No RAM restrictions (4MB or more)

MD5: C4A2BCCE96B95E03778028E0FEBEA977
SHA-1: CFCAF1296CDD7A1659F0E490FBC83DBD5CC862F2
CRC32: 23E4C878

Size : 124 MB
Download links : Hotfile Or Uploadbox Or Sharingmatrix

Active@ Boot Disk 5 Plus

Download UploadBox 221 MB
Download SharingMatrix

Active @ Boot Disk - includes a powerful set of tools that allow you to recover lost data, reset passwords, user accounts Windows, back up your system and securely erase data beyond recovery. Active @ Boot Disk is a bootable CD, and can even be used for computers that do not load the main operating system.
New special edition, compiled based on Windows PE 3 of Windows 7. This is not the official version, and compiled from scratch and it used some of the components and the shell Active @ Boot Disk.

The list of differences and additions:

- Updated all programs.
- Windows PE 3 (6.1.7600)
- Remote Desktop Connection (6.1.7600)
- SpeedCommander 13
- Symantec Ghost 11.5
- Symantec GhostCast Server
- Symantec GhostCast Explorer
- HDDScan 3.2
- ImageX (6.1.7600)
- Windows Deployment Services Image Capture
- Windows System Recovery Options
- Firefox 3.5.7
- PuTTy
And also the drivers for network adapters.
It is also possible to use with Windows Deployment Services.
The disc includes the following utilities Active @:
- Active @ Disk Image
- Active @ Password Changer
- Active @ KillDisk
- Active @ File Recovery
- Active @ Partition Recovery
- Active @ Disk Monitor
- Active @ Partition Manager
- Active @ Hex Editor
- Active @ Data CD / DVD Burner
- Network Utilities
- System Utilities
- Internet Utilities
and utilities for network configuration, Internet browsing, downloading drivers, equipment, etc. ..

Creat XP ghost image working on all computers

=============================================
Creat XP ghost image working on all computers
=============================================
Hi all

=================================================================
Note:
Befor going through tutorial,i would like to say thank you to all good
friends from all over world ,that i have never seen them and they have
never seen me,just we have got familier through web pages and my small
tutors.
This is 15th day of our new year in my country, and in this 15 days i
have got a lot of kindly messages from kind friends,and these messages
make me to know that i am alive and there are a lot of persons that like
me.
Thanks a lot ,live happy and helthy,have very very good life.
=================================================================

Several months ago ,when searching web pages i have seen a lot of new programs
to make ghost image of windows XP easyly.But all of them was working in languge
that i did not know,so it was very difficut for me to understand and took a lot
of time to know how to use them.

And at last i found a very nice program that has english GUI and makes syspreping
(then ghosting) of windows XP very easy and automatic.and the result works with
almost all kind of mainboards.

Needs:
--------
System Preparation Assisted Tool:At his time Spat6.0.0beta2 can be downloaded
from link below (9.83MB):
http://www.mediafire.com/?zumzhnmmljg

SkyDriver : At this Time SkyDriver 9.9 can be downloaded from links below:

SkyDriver link removed containing WAREZ

=================================================================

1.This tutor will work just for drive C: ,So Install your favorite Windows XP
(sp2 or sp3) in drive C: (No different if you install or not install your
system drivers).

2.Istall all your favorite programs like Office,FireFox,7zip, and ... and test
them to be sure they are working.

3.Install any windows updates that you need.

4.Make all your favorite customizations in your system.

5.Delete all unneeded files like files in temp folder and ...then Empty Recycle bine.

6.Extract Spat6.0.0beta2.exe some where forexample your desktop.

7.Extract SkyDriver to C:\Sysprep directory.

8.Make your favorite Back ground picture (800x600 0r 1024x768 24bit JPG) ,Name it
setup.jpg and put it in C:\Sysprep\ directory. This is the background picture that
you will see after applying the final ghost image to any computer,during first Boot.
(See pic_01.jpg from attachment).

9.You can put more files inside C:\Sysprep\ directory like directx and ...that will
be run during 1st boot (If you give the assosiated commands that i will tell about
them during tutor) and will be added to your installed system automatically.

10.Run Spat6.0.0beta2.exe,If every thing is ready to begin,it will show message ,OK it.

11.The main page of Spat6 will be shown (See pic_02-A).Do as below:

_ A _ Go to general tab select all.

_ B _ click on "background picture" ,Then select C:\Sysprep\setup.jpg ,then click
preview to show your picture ,then OK.

_ C _ Go to Interface tab and in "Run before mini-setup" section give infor mation
below (as you see in pic_02-:
C:\Sysprep\DrvS3.exe
Note: as i told in step 9 you can put other tools in C:\Sysprep\ directory
that as you see in pic_02-B,i have typed commands for thee other programs to
be integrated to our deployed system and will be run during mini setup.but
for this tutor you do not need them.

_ D _ Go to Reseal tab select your favorites.

_ E _ Back to General tab and click on sysprep

12.Spat starts working (About 1 or 2 minutes) then when the job is finished,it's
window will be closed.wait about 1 minute,then shut Down computer.

13.At this time your C: drive is ready to get ghost image of that.So Boot your
computer by 3rd party,get ghost image of drive C: and put it some where for
example in D:\My Ghost\

Now every thing are finished,and if you apply this ghost image to drive C: of
any computer,in 1st boot you will have mini setup proccess (about 10 minutes)
and when it is finished ,you will see that it works in all computers and also
all or some of drivers of that computer is installed automatically.This is because
we have used SkyDriver that has many of drivers inside itself in 7zip format (the
size of 7ziped drivers is 161 MB and extracted drivers are about 1.07 GB).

Now If you boot your computer normally,you will have 10 minutes of mini setup
proccess,then you can use you ready windows.this is the same proccess that you
will have if you apply ghost image to another computer.The only difference is
this that in some computers you will not need to install drivers and in some
else you may need to install one or more drivers


I tested this project with 7 different computers by different hardwares all was OK.
==================================================

hope will be some help

(shirin zaban)

Edite: Note that spat 6 is password protected and password is:
gostep.info

Creat XP Ghost Image Working on All Computers

=============================================
Creat XP ghost image working on all computers
=============================================
Hi all

=================================================================
Note:
Befor going through tutorial,i would like to say thank you to all good
friends from all over world ,that i have never seen them and they have
never seen me,just we have got familier through web pages and my small
tutors.
This is 15th day of our new year in my country, and in this 15 days i
have got a lot of kindly messages from kind friends,and these messages
make me to know that i am alive and there are a lot of persons that like
me.
Thanks a lot ,live happy and helthy,have very very good life.
=================================================================

Several months ago ,when searching web pages i have seen a lot of new programs
to make ghost image of windows XP easyly.But all of them was working in languge
that i did not know,so it was very difficut for me to understand and took a lot
of time to know how to use them.

And at last i found a very nice program that has english GUI and makes syspreping
(then ghosting) of windows XP very easy and automatic.and the result works with
almost all kind of mainboards.

Needs:
--------
System Preparation Assisted Tool:At his time Spat6.0.0beta2 can be downloaded
from link below (9.83MB):
http://www.mediafire.com/?zumzhnmmljg

SkyDriver : At this Time SkyDriver 9.9 can be downloaded from links below:

SkyDriver link removed containing WAREZ

=================================================================

1.This tutor will work just for drive C: ,So Install your favorite Windows XP
(sp2 or sp3) in drive C: (No different if you install or not install your
system drivers).

2.Istall all your favorite programs like Office,FireFox,7zip, and ... and test
them to be sure they are working.

3.Install any windows updates that you need.

4.Make all your favorite customizations in your system.

5.Delete all unneeded files like files in temp folder and ...then Empty Recycle bine.

6.Extract Spat6.0.0beta2.exe some where forexample your desktop.

7.Extract SkyDriver to C:\Sysprep directory.

8.Make your favorite Back ground picture (800x600 0r 1024x768 24bit JPG) ,Name it
setup.jpg and put it in C:\Sysprep\ directory. This is the background picture that
you will see after applying the final ghost image to any computer,during first Boot.
(See pic_01.jpg from attachment).

9.You can put more files inside C:\Sysprep\ directory like directx and ...that will
be run during 1st boot (If you give the assosiated commands that i will tell about
them during tutor) and will be added to your installed system automatically.

10.Run Spat6.0.0beta2.exe,If every thing is ready to begin,it will show message ,OK it.

11.The main page of Spat6 will be shown (See pic_02-A).Do as below:

_ A _ Go to general tab select all.

_ B _ click on "background picture" ,Then select C:\Sysprep\setup.jpg ,then click
preview to show your picture ,then OK.

_ C _ Go to Interface tab and in "Run before mini-setup" section give infor mation
below (as you see in pic_02-:
C:\Sysprep\DrvS3.exe
Note: as i told in step 9 you can put other tools in C:\Sysprep\ directory
that as you see in pic_02-B,i have typed commands for thee other programs to
be integrated to our deployed system and will be run during mini setup.but
for this tutor you do not need them.

_ D _ Go to Reseal tab select your favorites.

_ E _ Back to General tab and click on sysprep

12.Spat starts working (About 1 or 2 minutes) then when the job is finished,it's
window will be closed.wait about 1 minute,then shut Down computer.

13.At this time your C: drive is ready to get ghost image of that.So Boot your
computer by 3rd party,get ghost image of drive C: and put it some where for
example in D:\My Ghost\

Now every thing are finished,and if you apply this ghost image to drive C: of
any computer,in 1st boot you will have mini setup proccess (about 10 minutes)
and when it is finished ,you will see that it works in all computers and also
all or some of drivers of that computer is installed automatically.This is because
we have used SkyDriver that has many of drivers inside itself in 7zip format (the
size of 7ziped drivers is 161 MB and extracted drivers are about 1.07 GB).

Now If you boot your computer normally,you will have 10 minutes of mini setup
proccess,then you can use you ready windows.this is the same proccess that you
will have if you apply ghost image to another computer.The only difference is
this that in some computers you will not need to install drivers and in some
else you may need to install one or more drivers


I tested this project with 7 different computers by different hardwares all was OK.
==================================================

hope will be some help

(shirin zaban)

Edite: Note that spat 6 is password protected and password is:
gostep.info

Multibootable USB flashdisk untuk NetBook : Grub4DOS for Directly Booting iso Images


Saat-saat tertentu mungkin anda memerlukan booting dari flashdisk dikarenakan Windows anda ngadat atau pingsan diserang Virus yang semakin menjadi-jadi. Inilah cara paling cepat membuat satu flashdisk agar bisa booting langsung dari file iso (image cd/dvd) :
1. Siapkan pc, notebook, netbook atau tablet yang BIOS nya mendukung boot dari usb flashdisk. Sediakan flashdisk yang mendukung bootable. Kebanyakan netbook pasti mendukung boot dari usb flashdisk, sebagaimana kebanyakan flashdisk juga mendukung untuk di-bootable-kan. (alif memakai VanBook dan flashdisk Kingstone 8 GB & Adata 4 GB).
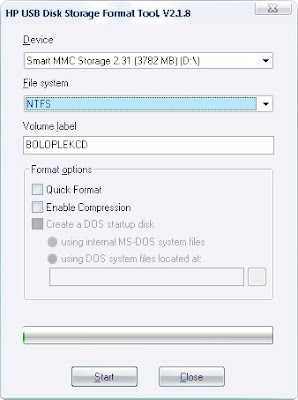
2. Format flashdisk dengan system file NTFS memakai HP USB Format tool (Download di sini, pakai HPUSBFW.exe). Hati-hati dan cermat saja saat memilih drive flashdiksnya, jangan salah pilih.

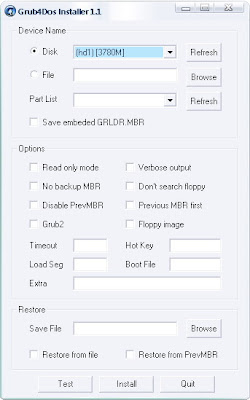
3. Install bootloader Grub4dos dengan menjalankan grubinst_gui.exe (di folder tool downloadan sudah tersedia, grubutil-1.1-bin-w32-19), pilih flashdisk dengan tepat. Abaikan saja menu pilihan hal-hal yang anda belum tahu pasti.

4. Copy grldr, ntldr, ntdetect.com, boot.ini dan menu.lst dari folder tool downloadan tadi, ke root flashdisk dan timpa saja bila ada yang sama.
5. Edit menu.lst dengan notepad sesuai selera kebutuhan anda. Contoh menu.lst alif :
color blue/cyan yellow/cyan
timeout 6
default /default

title Boot from Hardisk (Start Windows)
root (hd0,0)
chainloader (hd0,0)/ntldr

title Start Active@Boot CD
find --set-root --ignore-floppies /iso/activ.iso
map /iso/activ.iso (hd32)
map --hook
chainloader (hd32)
boot

title Start Mini WindowsXP Live
find --set-root --ignore-floppies /iso/xp.iso
map /iso/xp.iso (hd32)
map --hook
chainloader (hd32)
boot

title Start TrueBoot
find --set-root --ignore-floppies /iso/true.iso
map /iso/true.iso (hd32)
map --hook
chainloader (hd32)
boot

title Start PuppyBoot
root (hd0,0)
chainloader /isolinux.bin

title Start HirenBootCD 9.9
find --set-root --ignore-floppies /iso/hiren.iso
map /iso/hiren.iso (hd32)
map --hook
chainloader (hd32)
boot

title Start AviraBoot
find --set-root --ignore-floppies /iso/avira.iso
map /iso/avira.iso (hd32)
map --hook
chainloader (hd32)
boot

title Start UBCDBoot
find --set-root --ignore-floppies /iso/ubcd.iso
map /iso/ubcd.iso (hd32)
map --hook
chainloader (hd32)
boot

title Start DataRescue
find --set-root --ignore-floppies /iso/data.iso
map /iso/data.iso (hd32)
map --hook
chainloader (hd32)
boot

title Start TinyCore
find --set-root --ignore-floppies /iso/core.iso
map /iso/core.iso (hd32)
map --hook
chainloader (hd32)
boot

title Start Kolibri
find --set-root --ignore-floppies /iso/koli.iso
map /iso/koli.iso (hd32)
map --hook
chainloader (hd32)
boot

title Start MeneutBoot
find --set-root --ignore-floppies /iso/menuet.iso
map /iso/menuet.iso (hd32)
map --hook
chainloader (hd32)
boot

title Loading Reatogo
root (hd0,0)
chainloader /minint/setupldr.bin

6. Sesuaikan file iso image bootable anda dan copy/masukan ke dalam suatu folder di root dengan nama sesuai menu.lst (alif pakai nama “iso”)
7. Restart komputer
8. Setting agar bios bisa boot dari usb flashdisk, jika belum.
9. Saat boot dari flashdisk, pilih menu bootable yang anda inginkan. Alif sukses mencoba dan menjalankan Mini Windows XP Live, WinPE 2.0, Active@boot CD, Trueimageboot, Hiren’s boot CD 9.9, UBCD Ultimate BootCD, TinyCore Linux, Mini Windows 98 Live, Kolibri OS dan lainnya.

Keuntungan memakai cara ini :
- File-file boot relatif aman karena tersimpan dalam format iso image yang hampir tidak mungkin diserang Virus.
- Boot dari flashdisk relatif lebih cepat dibanding dari CD/DVD, dan flashdisk juga ditengarai lebih awet daripada keping CD atau DVD jika sering dipakai (cd lebih cepat kotor dan tergores).
- Anda tetap bisa menggunakan flashdisk sebagai media penyimpanan data. Bahkan…
- Dengan format NTFS, flashdisk anda sekarang bisa mengcopy satu file yang ukurannya lebih besar dari 4 GB, hal yang tidak bisa jika system filenya FAT16 atau FAT32.
- Untuk merubah, membuat atau menambah boot system baru, anda tidak perlu mengulang dari awal, cukup copy file iso-nya ke folder iso dan edit menu.lst. (Selama tidak terserang virus boot sector yang merusak tentunya)


Other Way
How to create a Multiboot USB Flash Drive that you can use to Boot Multiple ISO Files from USB. Please note that you will need a large USB device to be able to support every bootable ISO listed in the Grub menu. I will update and add more Bootable ISO files to the list as I find the time to test them. You can also contact us to submit working Bootable ISO entries for inclusion.

MultiBoot USB Menu (Simply select an ISO to boot from USB)

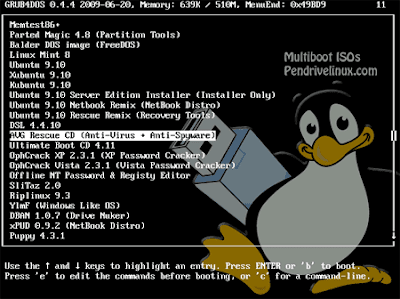
MultiBootISOs Works by using Syslinux to chainload GRUB4DOS. At Startup, the following Boot menu is presented.

MultiBoot Grub Menu - ISO files that can be Booted from USB

Note: You must manually add the ISO Files to your Flash Drive.

Basic Essentials to create a Multi ISO Boot USB Flash Drive

* "Fat32 Formatted" 512MB-8GB USB Flash Drive (depending on how many ISO's you use)
* PC that can boot from USB
* Windows XP/Vista/7 host to create the Bootable USB
* MultiBootISOs.exe
* Your select ISO Files

This MultiBoot process will currently enable you to Boot the following:

Official Distribution Sites and corresponding download links are listed.

* Memtest86+
* Clonezilla
* Linux Mint 8
* Ubuntu 9.10
* Xubuntu 9.10
* Kubuntu 9.10
* Ubuntu 9.10 Netbook
* Ubuntu Server Edition
* Parted Magic 4.9
* Partition Wizard 4.2
* Damn Small Linux
* Ultimate Boot CD
* SliTaz Linux Site
* Ophcrack XP Site
* Ophcrack Vista Site
* Offline NT Password + Reg Editor Site
* RIP Linux 9.3 Site
* Ylmf OS Site
* DBAN 1.0.7 (Hard Drive Nuker)
* xPUD (Simple Netbook Distro)
* FreeDOS Site (put balder10.img on USB)
* BKO boot.kernel.org (put gpxe.lkrn on USB)
* AVG Rescue CD
* Puppy Linux 4.3.1 (Download initrd.gz, vmlinuz, and pup-431.sfs and put them in the puppy folder on your USB)

How to Boot Multiple ISO Files from USB

1. Download and run MultiBootISOs.exe following the onscreen instructions
2. Download some ISO Files (listed above) and place them on your Flash Drive
3. Restart your PC setting it to boot from the USB device
4. Select the ISO you want to Boot from the Menu and enjoy!

That's all there is to it. You should now be booting your favorite ISO files from your Multi-Boot USB device!

Additional Notes: You can boot Ubuntu and remixes with persistence by using our Casper-RW Creator script to create a Casper-RW file on your USB device. One Distro can use casper persistence only!

If you don't have a floppy drive and get fd0 errors while booting, simply add floppy.allowed_drive_mask=0 to the kernel line for that menu entry.

To load Ophcrack tables when booted in this fashion, the tables folder needs to exist at the root of the USB device. Example E:\tables\vista_free. Download Tables from the Official site and unzip to your USB.

Boot Errors: While trying to run an ISO from USB, If you get a Boot error saying:

Error 60: File for drive emulation must be in one contiguous disk area

You'll need to defragment your ISO using one of the following tools:

contig - Command line tool to defragment ISO files.

wincontig – GUI tool to defragment ISO files.

For information on how to try other ISO's, see the "CDROM emulation (virtualization) section" in the official GRUB4DOS Readme file. Additionally, Here is another good third party guide that explains how things work.

If you successfully boot from a Linux Based ISO that isn't listed, let me know and I will add it to the list.